Navigation Properties In Entity Framework Using Database First Approach
Good day!
Here's a simple step by step tutorial on exploring the Navigation Properties of EF using the DB approach.
Step 2. Populate the two tables with fictitious information which will be used with the project.
Step 3. Create an empty ASP.NET MVC project and add an ADO.NET Entity Model that connects the Employees and Dependents tables.
Step 4. Add a view model class that will be used by the view as it's data source.
Step 5. The codes for the controller(handle post activity) and view(display search data) are as follows.
Controller
View
Sample Output given the search for employee John,the application will show the employee's dependents using Navigation properties from the controller code below.
OutputHere's a simple step by step tutorial on exploring the Navigation Properties of EF using the DB approach.
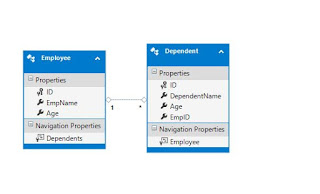
According to MSDN, Navigation properties provide a way to navigate an association between two entity types. Every object can have a navigation property for every relationship in which it participates. Navigation properties allow you to navigate and manage relationships in both directions, returning either a reference object (if the multiplicity is either one or zero-or-one) or a collection (if the multiplicity is many). You may also choose to have one-way navigation, in which case you define the navigation property on only one of the types that participates in the relationship and not on both.
Given the description, this example demonstrates the concept using two tables Employees and Dependents wherein you search for a particular employee and you can access the related
dependents of that employee. To start with, just perform the steps given below.
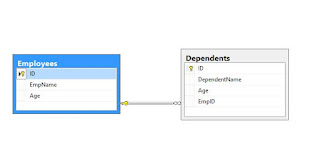
Step 1. Create two tables Employees and Dependents. Then create a diagram linking the two tables through employee id.
Step 2. Populate the two tables with fictitious information which will be used with the project.
Step 3. Create an empty ASP.NET MVC project and add an ADO.NET Entity Model that connects the Employees and Dependents tables.

Step 4. Add a view model class that will be used by the view as it's data source.
public class EmployeeDependentsViewModel
{
 public List<Dependent> Dependents { get; set; }
}
Controller
private OrganizationEntities entities;
private EmployeeDependentsViewModel empViewModel;
[HttpPost]
public ActionResult Search(FormCollection form)
{
 if (!string.IsNullOrEmpty(form["Search"]))
 {
  string search = form["Search"];
  empViewModel.Dependents = new List<Dependent>();
  empViewModel.Dependents = entities.Employees.FirstOrDefault(x => x.EmpName == search).Dependents.ToList();

  try
  {
   if (empViewModel.Dependents != null)
   {
    return View("Index", empViewModel);
   }
  }
  catch (Exception ex)
  {
   //todo exception
  }
 }
 return View("Index");
}
@model NavigationPropertiesDemo.Models.EmployeeDependentsViewModel

<h2>Index</h2>
<div class="container">
    <div class="row">
        @using (Html.BeginForm("Search", "Home", FormMethod.Post))
        {
            @Html.AntiForgeryToken()

            <div class="form-horizontal">
                <div class="form-group">
                    <span class="control-label col-md-2">Search Employee</span>
                    @Html.TextBox("Search", null, new { @class = "form-control col-md-10" })
                </div>
                <div class="form-group">
                    <div class="col-md-offset-2 col-md-10">
                        <input type="submit" value="Search" class="btn btn-primary" />
                        <input type="button" value="Cancel" class="btn btn-primary" />
                    </div>
                </div>
            </div>
        }
    </div>
    <div class="row">

        @if (Model != null)
        {
            <h3>List Of Dependents</h3>
            <table class="table  table-bordered">
                <tr>
                    <th>
                        @Html.DisplayName("Name")
                    </th>
                    <th>
                        @Html.DisplayName("Age")
                    </th>
                </tr>

                @foreach (var item in @Model.Dependents)
                {
                    <tr>
                        <td>
                            @Html.DisplayFor(model => item.DependentName)
                        </td>
                        <td>
                            @Html.DisplayFor(model => item.Age)
                        </td>
                    </tr>
                }

            </table>
        }
    </div>
</div>
empViewModel.Dependents = entities.Employees.FirstOrDefault(x => x.EmpName == search).Dependents.ToList();

Comments
Post a Comment