Posts

Showing posts from 2022

Donate

Quasar date.formatDate() Function Not Formatting Dates In Q-Table Component

Image
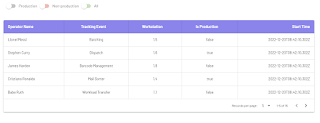
Hello All, When formatting date columns in Quasar table (QTable) the accepted solution is to use the date.formatDate() function and supply the parameters with the actual value and the format type such as below code. columns : [ //More Columns here... { name : "startTime" , label : "Start Time" , align : "right" , sortable : true , field : row => row.startTime, format : val => date.formatDate(val, "DD-MMM-YYYY hh:mm:ss A" ), }] And then render the columns to the table component. <q -table :data= "activeUsers" :columns= "columns" :separator= "separator" table-header-class= "bg-cts-purple text-white" :rows-per-page-options= "[10, 20, 30, 0]" :filter= "filter" :filter-method= "filterActiveUsers" > <template # body= "props" > <q -tr :props= "props" > <q -td key= "opera

Adobe Photoshop 2021 Or Adobe Illustrator 2021 Lagging And High CPU Utilization 100% In Windows 11

Image
Hello and Good day! I installed both Adobe Photoshop 2021 and Adobe Illustrator 2021 to my new laptop it's because my wife has background in Graphics Design which is helpful in her t-shirt business. Aside from that, she's also helping her sister-in-law's cake business by creating toppers and related decorations. After few hours of using both AI and Photoshop, she noticed that my laptop's temperature suddenly increase, the softwares response time becomes slow, sometimes the applications stops running and the CPU utilization sky rocketed to 100%. CPU Utilization maxed out to 100% if either Adobe Illustrator or Photoshop is opened or both. After searching the internet and trying out recomended solutions like resetting preferences, uninstall/re-install the software and other accepted answers;the solution that worked for me was to delete these two files specifically CoreSync.exe and CCXProcess.exe . Before deleting these files, make sure to end these processes from

How To Split Monitor Screen Into Multiple Columns Or Sections Or Divisions In Windows 11

Image
Hello, After my seminar on Windows 11 features, I have learned something interesting that most programmers need to enhance productivity and that is partitioning the screen into multiple columns or sections. Split-screen is a new feature that will allow the user to open multiple applications at once without have to toggle many times over. Each section can now be allocated to application that will positively increase productivity for working professionals or students alike. Before, dividing your screen is possible but only limited to two parts for two applications. However, with the new Windows 11 Snap Layout feature, this will allow the users to divide the screen more that two parts concurrently. The first option is using the Windows 11 built in feature called Snap Layout. First is to enable the Snap Layout Windows by opening Settings -> System -> Multitasking. Once the Snap Windows is toggled on, you may hover over the maximize button on any windows application. A pop-up

Run JavaScript Snippets Using Google Chrome Developer Tools

Image
Good evening gents, Most of the time, we tend to write JavaScript snippets using IDE's or text editors and then run that using a webbrowser. However, you can compile and run JavaScript snippets using Google Chrome Developer tools directly. To utilize this feature, open a new Google Chrome browser and press F12 to show the developer tools. Click on the expand arrow beside FileSystem and choose Snippets . Paste your code inside the empty snippet window. To run your code, right click on the snippet and select Run. You should see the output in the Console window below.

How To Test Or Check Dead Pixels And Backlight Bleed On Your Monitor Using Dead Pixel Checker In Windows 11

Image
Hello, When purchasing a brand new monitor or laptop, it is recommended to check first common monitor issues like dead pixels or backlight bleeding before closing the transaction with the physical store or online shop. One of the existing tools that I comes in handy and I use most of the time is the Dead Pixel Checker by DVANA that is hosted from Microsoft Store that can be installed on Windows 10 or 11 devices. I also recommend this app to my friends instead of the online tools because some of our local computer stores here in Cebu does'not have WIFI connections for us customers to hook up with. To use the software, download and install that in your machine. Once installed, click the Start Testing button to perform the diagnostic test. Your entire monitor screen will be filled first with red and then you may use the left or right cursor keys to select the other pre-defined colors of the tool such as green, blue, white and black to check any issues that may occur. Here&

Debugging Quasar Framework Applications Using Visual Studio Code (VS Code) Editor

Image
Hello, I was recently assigned and trained to work on future sprints for an existing project using Quasar Framework/Vue as Front-End and ASP.NET Core API as the back-end. Given that the project has been established for a couple of years now and has been significantly updated by the developer/architect in the US, learning through this involves sharing is caring, debugging and stepping through the code itself. With the goal at hand, I did some research on how to debug Quasar projects using the Visual Studio Code editor. After a few hours, I managed to debug the application based from the provided steps below. 1. Create a launch.json file if you have not do so. To create a launch.json file, click the Debug button on the left side of the editor and click 'create a launch.json file' link. This will create a launch.json file inside .vscode folder. 2. Replace the configurations object properties in the launch.json file with the settings below. Make sure to change the port of th

Acer Aspire 7 A715-42G-R9F8 AMD RyzenTM 7 Gaming Laptop

Image
Hello, I've been very busy these past few months due to personal reasons and some important matters to accomplish. And since, I'm going back to the office and don't have a workstation for personal usage, I decided to visit our local mall here in Cebu and check the computer stores for high-end laptops which is affordable. After hours of walking and canvassing inside the mall, I finally found what I'm looking for. The Acer store has just dropped the prices of their laptops including it's gaming models to almost 20% of which I certainly availed and purchased. I chose their Aspire 7 A715-42G-R9F8 AMD RyzenTM 7 gaming model because of it's technical specifications, design, physical characteristics and of course, the marked down price. The basic requirements for my personal laptop of which were satisfied by Acer Aspire 7 A715-42G-R9F8 model are the following: a. Processor Type - At least Intel i7 or Ryzen 7 b. RAM - Expandable to 32GB c. Hard Disk - 512 SSD d.

Add Dropdown Or Select Control With OnchangeEvent To Bootstrap-Table Wenzhixin In ASP.NET Core MVC

Image
Hello and Good day! In this blog post I will demonstrate on how to add a select or dropdown control in Bootstrap-Table by Wenzhixin with an OnChange() event in ASP.NET Core MVC. For this tutorial, I will only fetch records from a List variable with fake information and not from a database for simplicity sake. To begin create an ASP.NET Core MVC using Visual Studio that targets the .NET 5 Framework and perform the rest of the steps below. I. Project Setup A. Add via libman the Bootstrap-Table by Wenzhixin using CDN as the option. B. Add via libman font-awesome using CDN as the option. C. Add the latest tableExport.js to bootstrap-table folder. D. Add Nuget Package Microsoft.AspNetCore.Mvc.NewtonsoftJson 5.x E. Add a new class in the Models folder called Product.cs Here's the project structure. II. Coding The Project A. Product.cs - Add properties that describe a product. The status property is where the Dropdown of the Boostrap-Table is bound to. public class Product {

How To Align Table Columns Inside A Detail View With It's Parent Bootstrap-Table Columns In ASP.NET MVC

Image
Good evening, When working with Detail View option in Bootstrap-Table by Wenzhixin, there's a possibility that you have to render the details information using a table element to the detail view with same number of columns and headers of the parent table as per client request. However, upon rendering the details view with the table element, the child table's columns are not aligned with the parent Bootstrap-Table such as the sample screen below. I tried different solutions such as CSS, jQuery/JavaScript and MutationObserver Pattern which work for a few details view and the rest would be in disarray. Before presenting the solution, here are the codes involved in this project. Bootrap Table With data-detail-view property enabled. <table id= "tblDetailsReport" class= "TableBorderCollapse table-striped" data-toggle= "table" data-sort-name= "JobNumber" data-sort-order= "asc" data-search= "t

Install And Integrate Tailwind CSS 3.0 In ASP.NET Core MVC 5.0 Web Application

Image
Hi Felas! In this post, I will now demonstrate on how to integrate Tailwind CSS into an empty ASP.NET Core 5.0 MVC Web Application and the steps used where taken from my previous post on How To Install Tailwind CSS 3.0 Using Tailwind CLI And Visual Studio Code In Your Web Project Project Setup 1. Create a new ASP.NET Core MVC project using Visual Studio 2019. 2. Once created, add two empty css files called input.css and output.css inside the css subfolder of wwwroot. 3. In your _Layout.cshtml page, comment out or remove the code that references both the bootstrap.min.css and site.css files. 4. Replace that with output.css. For now this is just an empty stylesheet file and after the CLI build is done, this file will be populated with Tailwind css codes. Installing Tailwind CSS using CLI command 1. Open Package Manager Console in Visual Studio 2019 (Tools -> NuGet Package Manager -> Package Manager Console). 2. Run create package.json command. This will eventually ad

Donate