WPF CRUD Application Using DataGrid, MVVM Pattern, Entity Framework, And C#.NET
Good day to all!
2. Create a WPF Project and add four folders called DataAccess, Model, View and ViewModel.
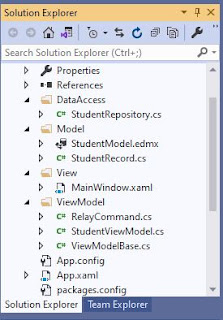
3. Your project structure may look similar with the screenshot provided below.
4. Add a repository class inside the DataAccess Folder that performs the CRUD operations towards the database.
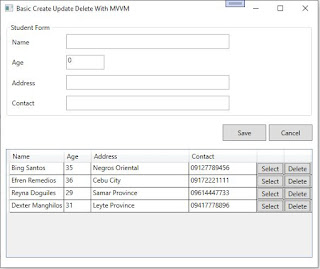
Output
Visual Basic Version
Source Code
Cheers!
Here's an example of a WPF CRUD (Create,Update and Delete) project using the DataGrid control, ADO.NET Entity Framework 6.x, C#.NET and Model–View–Viewmodel(MVVM) architectural pattern. This post was based from this tutorial WPF CRUD With DataGrid, Entity Framework And C#.NET except that we are now using the MVVM framework. The steps below are pretty straightforward and easy to follow.
I. Project Setup
1. Add a table called Students in you database. The complete script is found in this post WPF CRUD With DataGrid, Entity Framework And C#.NET2. Create a WPF Project and add four folders called DataAccess, Model, View and ViewModel.
3. Your project structure may look similar with the screenshot provided below.
II. Coding The Model and Repository Class
1. Inside the Model folder, add an ADO.NET Entity Data Model that connects to the Students table in your database. On my part, I named it StudentModel.
2. For the connectionstring name in App.config file, I changed it to StudentEntities.
3. Next is to add a StudentRecord class that has properties corresponding to the table columns and an ObservableCollection property used as itemsource for the DataGrid. This class inherits the ViewModelBase class added in the ViewModel folder which will mentioned on Coding The ViewModel Classes section so that there's a mechanism in handling property changes and notifications from the controls through data binding.
2. For the connectionstring name in App.config file, I changed it to StudentEntities.
<connectionStrings>
<add name="StudentEntities" connectionString="metadata=res://*/Entity.Student.csdl|res://*/Entity.Student.ssdl|res://*/Entity.Student.msl;provider=System.Data.SqlClient;provider connection string="data source=.;initial catalog=testdatabase;user id=sa;password=sql2012;MultipleActiveResultSets=True;App=EntityFramework"" providerName="System.Data.EntityClient" />
</connectionStrings>
public class StudentRecord : ViewModelBase
{
	private int _id;
	public int Id
	{
		get
		{
			return _id;
		}
		set
		{
			_id = value;
			OnPropertyChanged("Id");
		}
	}

	private string _name;
	public string Name
	{
		get
		{
			return _name;
		}
		set
		{
			_name = value;
			OnPropertyChanged("Name");
		}
	}

	private int _age;
	public int Age
	{
		get
		{
			return _age;
		}
		set
		{
			_age = value;
			OnPropertyChanged("Age");
		}
	}

	private string _address;
	public string Address
	{
		get
		{
			return _address;
		}
		set
		{
			_address = value;
			OnPropertyChanged("Address");
		}
	}

	private string _contact;
	public string Contact
	{
		get
		{
			return _contact;
		}
		set
		{
			_contact = value;
			OnPropertyChanged("Contact");
		}
	}

	private ObservableCollection<StudentRecord> _studentRecords;
	public ObservableCollection<StudentRecord> StudentRecords
	{
		get
		{
			return _studentRecords;
		}
		set
		{
			_studentRecords = value;
			OnPropertyChanged("StudentRecords");
		}
	}

	private void StudentModels_CollectionChanged(object sender, NotifyCollectionChangedEventArgs e)
	{
		OnPropertyChanged("StudentRecords");
	}
}
public class StudentRepository
{
	private StudentEntities studentContext = null;

	public StudentRepository()
	{
		studentContext = new StudentEntities();
	}

	public Student Get(int id)
	{
		return studentContext.Students.Find(id);
	}

	public List<Student> GetAll()
	{
		return studentContext.Students.ToList();
	}

	public void AddStudent(Student student)
	{
		if (student != null)
		{
			studentContext.Students.Add(student);
			studentContext.SaveChanges();
		}
	}

	public void UpdateStudent(Student student)
	{
		var studentFind = this.Get(student.ID);
		if (studentFind != null)
		{
			studentFind.Name = student.Name;
			studentFind.Contact = student.Contact;
			studentFind.Age = student.Age;
			studentFind.Address = student.Address;
			studentContext.SaveChanges();
		}
	}

	public void RemoveStudent(int id)
	{
		var studObj = studentContext.Students.Find(id);
		if (studObj != null)
		{
			studentContext.Students.Remove(studObj);
			studentContext.SaveChanges();
		}
	}
}
III. Coding The ViewModel Classes
1. Add a ViewModelBase class that implements the INofifyPropertyChanged interface. This interface basically informs binding clients that a property value has been updated. This class is inherited by the StudentRecord model of which it's properties are used in data binding and needed some sort of notification when a property's value has been changed.
public class ViewModelBase : INotifyPropertyChanged
{
	public event PropertyChangedEventHandler PropertyChanged;

	protected void OnPropertyChanged(string propertyName)
	{
		if (PropertyChanged != null)
		{
			PropertyChanged(this, new PropertyChangedEventArgs(propertyName));
		}
	}
}
2. Next is to add a RelayCommand class that implements the ICommand interface. Commands are used for handling events in WPF with regards to the MVVM Architectural Pattern. The sole purpose of a command is to relay or distribute its functionality to other objects by invoking delegates. The default return value for a CanExecute method is true. A good explanation of what a RelayCommand class is explained in stackoverflow.com.
public class RelayCommand : ICommand
{
	private readonly Action<object> _execute;
	private readonly Predicate<object> _canExecute;

	public RelayCommand(Action<object> execute)
		: this(execute, null)
	{
	}

	public RelayCommand(Action<object> execute, Predicate<object> canExecute)
	{
		if (execute == null)
			throw new ArgumentNullException("execute");
		_execute = execute;
		_canExecute = canExecute;
	}

	public bool CanExecute(object parameter)
	{
		return _canExecute == null ? true : _canExecute(parameter);
	}

	public event EventHandler CanExecuteChanged
	{
		add { CommandManager.RequerySuggested += value; }
		remove { CommandManager.RequerySuggested -= value; }
	}

	public void Execute(object parameter)
	{
		_execute(parameter);
	}
}
3. Last is to create a ViewModel class that performs the command binding of the buttons which then calls specific methods that handles the CRUD operations and updating of property values. An example is the SaveCommand bound with the Save button in the view. When the save button is clicked, the save command then executes the SaveData() method and saves the information to the database and then reloads everything to the Observable object which is the ItemSource of the DataGrid. A detailed and lengthy explanation of what MVVM does is presented here WPF Apps With The Model-View-ViewModel Design Pattern. The ViewModel class can still be refactored like putting commands and entities into each different classes or so. But for this demo, I ended up putting everything here.
public class StudentViewModel
{
	private ICommand _saveCommand;
	private ICommand _resetCommand;
	private ICommand _editCommand;
	private ICommand _deleteCommand;
	private StudentRepository _repository;
	private Student _studentEntity = null;
	public StudentRecord StudentRecord { get; set; }
	public StudentEntities StudentEntities { get; set; }

	public ICommand ResetCommand
	{
		get
		{
			if (_resetCommand == null)
				_resetCommand = new RelayCommand(param => ResetData(), null);

			return _resetCommand;
		}
	}

	public ICommand SaveCommand
	{
		get
		{
			if (_saveCommand == null)
				_saveCommand = new RelayCommand(param => SaveData(), null);

			return _saveCommand;
		}
	}

	public ICommand EditCommand
	{
		get
		{
			if (_editCommand == null)
				_editCommand = new RelayCommand(param => EditData((int)param), null);

			return _editCommand;
		}
	}

	public ICommand DeleteCommand
	{
		get
		{
			if (_deleteCommand == null)
				_deleteCommand = new RelayCommand(param => DeleteStudent((int)param), null);

			return _deleteCommand;
		}
	}

	public StudentViewModel()
	{
		_studentEntity = new Student();
		_repository = new StudentRepository();
		StudentRecord = new StudentRecord();
		GetAll();
	}

	public void ResetData()
	{
		StudentRecord.Name = string.Empty;
		StudentRecord.Id = 0;
		StudentRecord.Address = string.Empty;
		StudentRecord.Contact = string.Empty;
		StudentRecord.Age = 0;
	}

	public void DeleteStudent(int id)
	{
		if (MessageBox.Show("Confirm delete of this record?", "Student", MessageBoxButton.YesNo)
			== MessageBoxResult.Yes)
		{
			try
			{
				_repository.RemoveStudent(id);
				MessageBox.Show("Record successfully deleted.");
			}
			catch (Exception ex)
			{
				MessageBox.Show("Error occured while saving. " + ex.InnerException);
			}
			finally
			{
				GetAll();
			}
		}
	}

	public void SaveData()
	{
		if (StudentRecord != null)
		{
			_studentEntity.Name = StudentRecord.Name;
			_studentEntity.Age = StudentRecord.Age;
			_studentEntity.Address = StudentRecord.Address;
			_studentEntity.Contact = StudentRecord.Contact;

			try
			{
				if (StudentRecord.Id <= 0)
				{
					_repository.AddStudent(_studentEntity);
					MessageBox.Show("New record successfully saved.");
				}
				else
				{
					_studentEntity.ID = StudentRecord.Id;
					_repository.UpdateStudent(_studentEntity);
					MessageBox.Show("Record successfully updated.");
				}
			}
			catch (Exception ex)
			{
				MessageBox.Show("Error occured while saving. " + ex.InnerException);
			}
			finally
			{
				GetAll();
				ResetData();
			}
		}
	}

	public void EditData(int id)
	{
		var model = _repository.Get(id);
		StudentRecord.Id = model.ID;
		StudentRecord.Name = model.Name;
		StudentRecord.Age = (int)model.Age;
		StudentRecord.Address = model.Address;
		StudentRecord.Contact = model.Contact;
	}

	public void GetAll()
	{
		StudentRecord.StudentRecords = new ObservableCollection<StudentRecord>();
		_repository.GetAll().ForEach(data => StudentRecord.StudentRecords.Add(new StudentRecord()
		{
			Id = data.ID,
			Name = data.Name,
			Address = data.Address,
			Age = Convert.ToInt32(data.Age),
			Contact = data.Contact
		}));
	}
}
IV. Databinding and View
1. Last but not the least is the view. Move the MainWindow page into the View folder of the project. In the constructor method , set the class DataContext with the StudentViewModel class. You may opt to set the DataContext through XAML.public partial class MainWindow : Window { public MainWindow() { InitializeComponent(); this.DataContext = new StudentViewModel(); } }
2. Next is to add several controls like textboxes for accepting input, buttons to trigger events and the DataGrid control to show the entire updated information from the database. These controls have been glued to the ViewModel class through the Binding property. The input controls are grouped in a GroupBox panel, while the Save and Reset buttons are inside the StackPanel container. The DataGrid is also inside the StackPanel container and each of these containers are arranged horizontally inside a StackPanel parent container.
<Window x:Class="MVVMDemo.View.MainWindow"
        xmlns="http://schemas.microsoft.com/winfx/2006/xaml/presentation"
        xmlns:x="http://schemas.microsoft.com/winfx/2006/xaml"
        xmlns:d="http://schemas.microsoft.com/expression/blend/2008"
        xmlns:mc="http://schemas.openxmlformats.org/markup-compatibility/2006"
        xmlns:local="clr-namespace:MVVMDemo.View"
        mc:Ignorable="d"
        Title="Basic Create Update Delete With MVVM"
        Height="500" Width="600">
    <StackPanel Orientation="Vertical">
        <GroupBox Header="Student Form" Margin="10">
            <Grid Height="150">
                <Grid.RowDefinitions>
                    <RowDefinition Height="1*"/>
                    <RowDefinition Height="1*"/>
                    <RowDefinition Height="1*"/>
                    <RowDefinition Height="1*"/>
                </Grid.RowDefinitions>
                <Grid.ColumnDefinitions>
                    <ColumnDefinition Width="100"/>
                    <ColumnDefinition Width="*"/>
                </Grid.ColumnDefinitions>
                <Label Content="Name" HorizontalAlignment="Left"
                       VerticalContentAlignment="Center" Grid.Column="0" Grid.Row="0"/>
                <TextBox Grid.Row="0" Grid.Column="1" x:Name="TextBoxName" Height="27"
                       Text="{Binding Path=StudentRecord.Name, Mode=TwoWay}"  Margin="5"  Width="300" HorizontalAlignment="Left"/>
                <Label Content="Age" HorizontalAlignment="Left" VerticalContentAlignment="Center"
                       Grid.Row="1" Grid.Column="0"/>
                <TextBox Grid.Row="1" Grid.Column="1" x:Name="TextBoxAge" Height="27"
                       Text="{Binding Path=StudentRecord.Age, Mode=TwoWay}" Margin="5" Width="70" HorizontalAlignment="Left"/>
                <TextBlock Grid.Row="1" Grid.Column="1" x:Name="TextBlockId"
                       Visibility="Hidden" Text="{Binding Path=StudentRecord.Id, Mode=TwoWay}"/>
                <Label Content="Address" HorizontalAlignment="Left" VerticalContentAlignment="Center"
                       Grid.Row="2" Grid.Column="0" />
                <TextBox Grid.Row="2" Grid.Column="1" x:Name="TextBoxAddress" Height="27"
                       Text="{Binding Path=StudentRecord.Address, Mode=TwoWay}" Margin="5" Width="300" HorizontalAlignment="Left"/>
                <Label Content="Contact" HorizontalAlignment="Left" VerticalContentAlignment="Center"
                       Grid.Row="3" Grid.Column="0" />
                <TextBox Grid.Row="3" Grid.Column="1" x:Name="TextBoxContact" Height="27"
                       Text="{Binding Path=StudentRecord.Contact, Mode=TwoWay}" Margin="5" Width="300" HorizontalAlignment="Left"/>
            </Grid>
        </GroupBox>
        <StackPanel Height="40" Orientation="Horizontal" HorizontalAlignment="Right">
            <Button x:Name="ButtonSave" Content="Save" Height="30" Width="80"
                    Command="{Binding SaveCommand}"/>
            <Button x:Name="ButtonCancel" Content="Cancel" Height="30" Width="80"
                    Command="{Binding ResetCommand}" Margin="5,0,10,0"/>
        </StackPanel>
        <StackPanel Height="210">
            <DataGrid x:Name="DataGridStudents" AutoGenerateColumns="False"
                      ItemsSource="{Binding StudentRecord.StudentRecords}" CanUserAddRows="False" Height="200" Margin="10">
                <DataGrid.Columns>
                    <DataGridTextColumn Header="Name" Binding="{Binding Path=Id}" Visibility="Hidden"/>
                    <DataGridTextColumn Header="Name" Binding="{Binding Path=Name}" Width="100"  IsReadOnly="True"/>
                    <DataGridTextColumn Header="Age" Binding="{Binding Path=Age}" Width="50"  IsReadOnly="True"/>
                    <DataGridTextColumn Header="Address" Binding="{Binding Path=Address}" Width="180" IsReadOnly="True"/>
                    <DataGridTextColumn Header="Contact" Binding="{Binding Path=Contact}" Width="125" IsReadOnly="True"/>
                    <DataGridTemplateColumn Width="50">
                        <DataGridTemplateColumn.CellTemplate>
                            <DataTemplate>
                                <Button Content="Select" x:Name="ButtonEdit" CommandParameter="{Binding Path=Id}"
                                        Command="{Binding Path=DataContext.EditCommand,RelativeSource={RelativeSource FindAncestor,
                                                AncestorType=Window}}"/>
                            </DataTemplate>
                        </DataGridTemplateColumn.CellTemplate>
                    </DataGridTemplateColumn>
                    <DataGridTemplateColumn Width="50">
                        <DataGridTemplateColumn.CellTemplate>
                            <DataTemplate>
                                <Button Content="Delete" x:Name="ButtonDelete" CommandParameter="{Binding Path=Id}"
                                        Command="{Binding Path=DataContext.DeleteCommand, RelativeSource={RelativeSource FindAncestor,
                                                AncestorType=Window}}"/>
                            </DataTemplate>
                        </DataGridTemplateColumn.CellTemplate>
                    </DataGridTemplateColumn>
                </DataGrid.Columns>
            </DataGrid>
        </StackPanel>
    </StackPanel>
</Window>
Here's the Visual Basic version of this blog post WPF CRUD Application Using DataGrid, MVVM Pattern, Entity Framework, And VB.NET
Source Code
Finally, I have the spare time to create a code sample for this blog post. You may now download the project written in Visual Studio 2022 at my Github Page.
Cheers!


Excellent, thanks!
ReplyDeleteAwesome. You're welcome!
DeleteThanks Bro, Very Usefull
ReplyDeleteYou're welcome! 👍
DeleteWhere is the Student class
ReplyDeleteSee Step #3 in Coding The Model and Repository Class. The class is called StudentRecord that inherits ViewModelBase.
DeleteGreat article, thank you! It would be so kind of you, if you could add a link to the git repository with all the source code.
ReplyDeleteHi, will upload the source code to the github soon. If you follow this tutorial, this will provide you a running application. All you need to do is fix the namespaces based from your project structure. :)
DeleteHave you uploaded the code to github? I really would like to see this.
DeleteOne of the only end to end examples of MVVM and data access I could find. This helped no end on improving my code and seeing the process from start to finish. Thanks, seriously appreciated!
ReplyDeleteYou're welcome!
Deleteplz provide gitrepo
ReplyDeleteI have updated the blogpost with the source code link to my GitHub page.
DeleteExcellent, simple project to follow with mostly just the basics end 2 end, TY!!!!
ReplyDeleteYou're welcome!
Delete