How To Setup Power BI On-Premises Data Gateway In Power BI Service
Hello Gents,
Here's how to setup a Power BI On-Premises Data Gateway to a On-Premises data source like Microsoft SQL Server or any other databases in Power BI Service so that you don't have to move your datasources elsewhere. The idea of a gateway is to keep your reports in the Power BI Service up to date of it's content through Schedule refresh or live connectivity. This is important so that stakeholders and top management can access the reports anytime through the app or website with updated information. So to setup a Power BI Data Gateway in your machine, just follow the steps provided below to accomplish the task at hand.
2. Sign-in with your personal or domain account.
3. Choose on-premises data gateway (recommended)
4. Choose register a new gateway on this computer if fresh install.
5. Fill out on-premises data gateway after registration.
New on-premises data gateway name and Recovery key. Make sure to keep the Recovery key. You might need this in the future.
6. Click Configure.
a. Data Source Name
b. Data Source Type
c. Server, Database
d. Authentication Method
e. Username (Domain Account)
f. Password (Domain Password)
*** Note: For DirectQuery connection mode, we don’t need to worry on data refresh scheduling. 4. If the credentials are correct, a connection successful message will appear on top of the configuration setting. 5. Go back to the gateway connection settings and update the Maps to: dropdown button of the existing gateway. Then choose apply. 6. Configure Schedule Refresh for the report data source. Set the Refresh frequency, Time zone, Time (you can add up to 8 times), and Emails if refresh fails. Then click apply.
That's all there is to setup. Enjoy!
Here's how to setup a Power BI On-Premises Data Gateway to a On-Premises data source like Microsoft SQL Server or any other databases in Power BI Service so that you don't have to move your datasources elsewhere. The idea of a gateway is to keep your reports in the Power BI Service up to date of it's content through Schedule refresh or live connectivity. This is important so that stakeholders and top management can access the reports anytime through the app or website with updated information. So to setup a Power BI Data Gateway in your machine, just follow the steps provided below to accomplish the task at hand.
I. Download Data Gateway For The Reports
1. Download datagateway from Microsoft Powerbi website: Connect to on-premises data sources with a Power BI gateway2. Sign-in with your personal or domain account.
3. Choose on-premises data gateway (recommended)
4. Choose register a new gateway on this computer if fresh install.
5. Fill out on-premises data gateway after registration.
New on-premises data gateway name and Recovery key. Make sure to keep the Recovery key. You might need this in the future.
6. Click Configure.
II. Setup On-Premise Data Gateway For The Reports
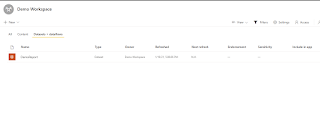
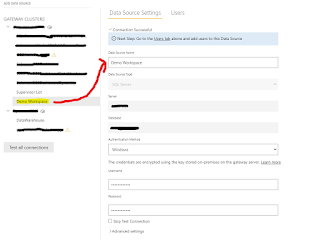
1. Open your Power BI workspace and click on the schedule refresh icon of a report Dataset. 2. Click on the Manage Gateway button to add a new datasource. 3. Add a new Data Source for the DemoWorkspace report and then supply values to the Data Source Settingsa. Data Source Name
b. Data Source Type
c. Server, Database
d. Authentication Method
e. Username (Domain Account)
f. Password (Domain Password)
*** Note: For DirectQuery connection mode, we don’t need to worry on data refresh scheduling. 4. If the credentials are correct, a connection successful message will appear on top of the configuration setting. 5. Go back to the gateway connection settings and update the Maps to: dropdown button of the existing gateway. Then choose apply. 6. Configure Schedule Refresh for the report data source. Set the Refresh frequency, Time zone, Time (you can add up to 8 times), and Emails if refresh fails. Then click apply.
That's all there is to setup. Enjoy!




Comments
Post a Comment