Posts

Donate

PdfSharpCore And ImageSharp - Memory Keeps Increasing Or Memory Leak When Adding Hundreds Of Images To Create PDF Book

Image
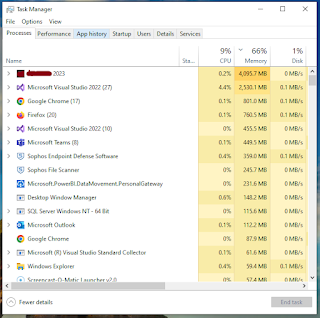
Good day everyone! We are currently upgrading our WPF Cataloging application that has a feature to generate pdf books with multiple pages on the fly and each book may contain thirty or more images and may reach even a hundred from .NET Framework to .NET 7. Upon printing of a book,we discovered that it consume lots of memory even reaching to 5GB per book. Because our logic in generating a catalog involves adding texts and loading several images in memory and then print those details on a single pdf file, it may have caused to memory usage to skyrocket at a tremendous result. The code below shows how we load images using PdfSharpCore and ImageSharp. private ImageSource.IImageSource GetImageFromList<TPixel>( string key, string which, string name) where TPixel : unmanaged, IPixel<TPixel> { ImageSource.IImageSource rtn; int width; int height; width = 0; height = 0; if (ImageList.ContainsKey(key)) { rtn = ImageList[key]; } else { if (Ima

Xamarin Forms - Waiting for the emulator is ready In Visual Studio 2019

Image
Hello, I've experienced this error lately when running my Xamarin Forms project. The emulator loads on screen without the UI and in Visual Studio's output window, it says Waiting for the emulator is ready. It's just like waiting for the emulator to load forever. After trying out some accepted solutions, deleting and adding back the emulator works for me. First is to open the Android Device manager in Visual Studio IDE. Go to Tools Menu -> Android -> Android Device Manager. Delete the existing emulator and add it back again. In my current setup it's " Pixel 2 Pie 9.0 - API 28 ". After deleting and adding back the emulator, my Xamarin Forms app shows in the emulator. Cheers!

Vue 2 Charts (vue-chartjs v4) Not Working In Quasar Framework Project Version 1x

Image
Hello, We have a new sprint to work with that is to add metrics module to an existing project with tabular and charts. Since this is a legacy version of Quasar project, we need to add an old version of charts plugin also. There were lots of chart plugins to choose from but the team had the experience working with chart.js before in ASP.NET MVC projects and so we opt to select vue-chartjs as such. However, getting the plugin to work with the legacy Quasar project is a pain in the butt. I had to research in the forums and stackoverflow to make it work since the commands to install vuechart-js does not work on our app. After researching and experimenting for several hours, I came up with the solution that is to specify the versions of vue-chartjs and the chart.js during installation npm i vue-chartjs@4.1.2 chart.js@3.9.1 . After that, we can now fully utilize the features of vue-chartjs v4. The Quasar project that we are working has the following versions: Quasar: 1.2.2 Vue.js: 2

Turn On Samsung Galaxy Note 10 Lite Edge Lighting

Image
Good day! After updating my Samsung Galaxy Note 10 Lite mobile phone from Android 12 to Android 13, I need to enable the Edge Lighting again. To do this go to Settings -> Notifications -> select Notification pop-up style. Select Brief -> Edge Lighting Style From there, you can choose an Edge Lighting style based from the templates provided. For this to work with Facebook Messenger, open your messenger app and go to Settings -> Notifications & Sounds. Toggle/switch on the 'Show as pop-up' feature. That's it!

How To Enable Notepad++ Editor Dark Theme Mode In Windows 10 Or Windows 11

Image
Hello, I've just downloaded the latest updates of my Notepad++ editor and randomly checked the settings menu if there are added features that I can play with. After exploring the settings menu, one of the things I noticed is that I can now change the theme of the editor for light to dark. To do that, go to Settings -> Preferences -> Dark Mode. By default, Light mode is enabled. Switching from Light to Dark mode changes the background color/theme to something darker which is preferable by most users. Cheers!

Quasar date.formatDate() Function Not Formatting Dates In Q-Table Component

Image
Hello All, When formatting date columns in Quasar table (QTable) the accepted solution is to use the date.formatDate() function and supply the parameters with the actual value and the format type such as below code. columns : [ //More Columns here... { name : "startTime" , label : "Start Time" , align : "right" , sortable : true , field : row => row.startTime, format : val => date.formatDate(val, "DD-MMM-YYYY hh:mm:ss A" ), }] And then render the columns to the table component. <q -table :data= "activeUsers" :columns= "columns" :separator= "separator" table-header-class= "bg-cts-purple text-white" :rows-per-page-options= "[10, 20, 30, 0]" :filter= "filter" :filter-method= "filterActiveUsers" > <template # body= "props" > <q -tr :props= "props" > <q -td key= "opera

Adobe Photoshop 2021 Or Adobe Illustrator 2021 Lagging And High CPU Utilization 100% In Windows 11

Image
Hello and Good day! I installed both Adobe Photoshop 2021 and Adobe Illustrator 2021 to my new laptop it's because my wife has background in Graphics Design which is helpful in her t-shirt business. Aside from that, she's also helping her sister-in-law's cake business by creating toppers and related decorations. After few hours of using both AI and Photoshop, she noticed that my laptop's temperature suddenly increase, the softwares response time becomes slow, sometimes the applications stops running and the CPU utilization sky rocketed to 100%. CPU Utilization maxed out to 100% if either Adobe Illustrator or Photoshop is opened or both. After searching the internet and trying out recomended solutions like resetting preferences, uninstall/re-install the software and other accepted answers;the solution that worked for me was to delete these two files specifically CoreSync.exe and CCXProcess.exe . Before deleting these files, make sure to end these processes from

How To Split Monitor Screen Into Multiple Columns Or Sections Or Divisions In Windows 11

Image
Hello, After my seminar on Windows 11 features, I have learned something interesting that most programmers need to enhance productivity and that is partitioning the screen into multiple columns or sections. Split-screen is a new feature that will allow the user to open multiple applications at once without have to toggle many times over. Each section can now be allocated to application that will positively increase productivity for working professionals or students alike. Before, dividing your screen is possible but only limited to two parts for two applications. However, with the new Windows 11 Snap Layout feature, this will allow the users to divide the screen more that two parts concurrently. The first option is using the Windows 11 built in feature called Snap Layout. First is to enable the Snap Layout Windows by opening Settings -> System -> Multitasking. Once the Snap Windows is toggled on, you may hover over the maximize button on any windows application. A pop-up

Run JavaScript Snippets Using Google Chrome Developer Tools

Image
Good evening gents, Most of the time, we tend to write JavaScript snippets using IDE's or text editors and then run that using a webbrowser. However, you can compile and run JavaScript snippets using Google Chrome Developer tools directly. To utilize this feature, open a new Google Chrome browser and press F12 to show the developer tools. Click on the expand arrow beside FileSystem and choose Snippets . Paste your code inside the empty snippet window. To run your code, right click on the snippet and select Run. You should see the output in the Console window below.

How To Test Or Check Dead Pixels And Backlight Bleed On Your Monitor Using Dead Pixel Checker In Windows 11

Image
Hello, When purchasing a brand new monitor or laptop, it is recommended to check first common monitor issues like dead pixels or backlight bleeding before closing the transaction with the physical store or online shop. One of the existing tools that I comes in handy and I use most of the time is the Dead Pixel Checker by DVANA that is hosted from Microsoft Store that can be installed on Windows 10 or 11 devices. I also recommend this app to my friends instead of the online tools because some of our local computer stores here in Cebu does'not have WIFI connections for us customers to hook up with. To use the software, download and install that in your machine. Once installed, click the Start Testing button to perform the diagnostic test. Your entire monitor screen will be filled first with red and then you may use the left or right cursor keys to select the other pre-defined colors of the tool such as green, blue, white and black to check any issues that may occur. Here&

Donate